Search This Blog

Wednesday, January 18, 2012

Wednesday night fun times!

On Wednesdays, D bowls in a league... this means I'm home alone and free to play as I please!

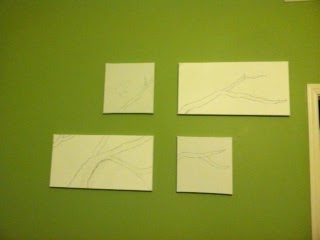
Tonight's project: Transfer images on to stretched canvas.

I'm cheap. Since this was the first try, I wanted to go as cheap as possible, so I printed out 2 pictures of our kiddos at an undisclosed location (that's right, SECRETS!) and got the smallest canvases I could find. Because they're cheapest. Yep.

Step 1:  Print picture on regular printer paper. Use gel medium to adhere picture (I flipped the picture around before printing it, as they transfer backwards) to canvas. Cover canvas in one good flat coat of this stuff.  I was told (by Pinterest) to get medium gloss gel medium or something, but I ended up with this stuff and it apparently worked just fine!
Glue the pics on to the Canvas with ^^ That stuff... looks like this... 


Step 2: Smooth out lines on paper with something flat... credit card, ruler, or... you know, cardboard from the new glitter you just bought... :)

Step 3: WAIT forEVER for it to DRY.  (And by forever, I mean about 3-4 hours)
Step 4: Douse the paper with water from a squirt bottle til it soaks through... pull/ball/roll off the paper slowly.


 Rub gently and the paper will start to rub off.

I rubbed the edges of each picture to make them look all jagged, too. So that's neat. :)  ALSO, Carmen is too dark. I kept re-wetting and re-rubbing to get all the paper off of her picture so that I could see her & accidentally rubbed off some of the picture. Oh well. That adds to the novelty, right? 


Carmen's finished picture... note the white spots where I rubbed the picture off. Haha oops. 

Tini's completed picture... 
Step 5: When the canvas is pretty much dry, swipe with a medium-thick layer of the gloss/gel medium stuff again to set it. This way- you won't continue to wipe off the picture! YAY!

I am so excited to know how to do this! You better believe that I will be doing this with every dang picture from NOW ON.

Oh- relatives, loved ones, etc... you're welcome. You're welcome for your awesome pictures you'll be getting done like this for the rest of your lives!
Enjoy! 
♥ 
EM

Saturday, January 14, 2012

Shutterrific!

Buying a house is dangerous business, I tell ya.
Here's why I say this: when we were house shopping, I had a tendency to see one thing I loved and notice nothing else. In the house we ended up purchasing, that one thing was our bath tub. It's a giant jacuzzi/garden/whatever you want to call it- tub. Jets and all. I saw it, jumped in in my clothes and shoes, and sat down while proclaiming, "I'LL TAKE IT!" And we did. 
  The following things were items that may have slipped by me: 
     - No fireplace
     - No entry closet/LR storage
     - No water pressure in the master bathroom shower
     - TINY CLOSET to SHARE *(it looks like a "Walk-in" until stuff is in it, then it's a "Stand-in-&-don't-turn-around-too-quick-or-you'll-knock-over-my-shoerack" And our condo had 2 closets in the master- one normal for him, and one that slightly resembled a baby-sized bedroom for me. SO SPACIOUS. I lust while thinking of how badly I miss that closet) 
     - Tiny Pantry
     - Ugly gold fixtures EVERYWHERE 

Now, I don't want you to think I hate this house, as that list IS somewhat extensive, but I can say--- I may already be making a list of features that we MUST have in our next house. In 5 years. When we have a kid or two and have severely outgrown this 1222 square foot lovenest.  

All that being said, I have solved some of the problem today. We have no coat storage since we have no entryway/LR closet. 

ENTER $5 SHUTTER (and a bunch of hooks) 
One day, once this room is painted, the shutter will be much more noticeable

 Most people who know D & I well know that we both have an affinity for any clothing article that comes equipped with a hood and pouch. Maybe we love the way hoodies accent our svelte figures, maybe we really enjoy repping our teams/sports/etc, or maybe we just really like being able to throw something on that is comfy and alleviates our need to suck-in because of the adorable potato sack shape. Who knows?  Either way, we have an extensive collection of all things hoodie. There's really no convenient way to store these wardrobe monstrosities, either. I mean, EACH ONE takes up an entire drawer if you fold them.  Also, I needed a place to store scarves so I could find them, since "under the bed or on top of the table" has become my most frequently played game, but it has never been my favorite.  

So here's how it worked. 

Step 1. Buy a shutter from Habitat for Humanity for $5. Yep. $5. That is a STEAL. LOVE it! 


Step 2.  Figure out where to hang it and put screws/anchors in wall. I write all over everything when hanging stuff- thankfully, all my notes end up under whatever gets hung. 

Step 3. Attach hanger thingies. Yes. That's the technical term.  I began to do this myself, but he just wanted to help, so I let him... ♥ 
This makes me think of whenever there's a children's activity described on TV and they say, "Ask a grown up to help!"

Step 4. Attach hooks for hanging scarves, jackets, etc.  

Step 5. Take oldest child to Target for the 2nd time today to get more hooks. Realize they no longer make the same chrome hooks as you have already put on the stupid shutter.  Concede to using brushed nickel and dare anyone to say somethin! 

This dog is ferocious. You've been warned. 
Step 6.  Hang the dang thing & finish putting hookers on!


Have a grown up help with this part, too, Kids! 

Step 7. Decorate accordingly.  BAM! 
YAY! Now they can all cuddle and keep each other warm until I need them!


That's all I have for now.

Well, that and 
GO PACKERS!!! 

EM


Saturday, January 7, 2012

Twenty-Oh-Twelve

That's right. Twenty-oh-twelve. That's what I said.
No, that's not what I call it... as far as you know.

By now, you have realized that I am an awesomely fantastic blog-updater, and you haven't missed a thing. Right? I mean, I update daily, so I don't know why you're making that face.

I haven't updated about how awesome my 101 in 1001 is going (or about anything else at all) in a while, so I thought tonight would be a good time to do so! You are welcome. In advance.

After this update, I have completed 27% of my list (well, actually more, but I haven't blogged about the others, so I'm only counting 28/101 items) and I am 37.3% through my 1001 days.  That's not too bad!

I have (since last update & strikethrough) completed the following:
#35. Spend time in California
   This was a LONG and EXCRUCIATING story. Basically, in October, D had a conference in Vegas (Yeah- 2 birds w/1 stone. #54.) and we flew out American Airlines. Our layover was in LAX, and our plane had to be rerouted due to bad weather... so we- and 10 other people- were stranded in LS for 16 hours. I thought- LET'S GO TO THE BEACH!!! So we hopped in a cab to Santa Monica at 10:30pm and went to a bar by the pier. I'm not counting this as #1. Visit the Beach because I did not get sandy. haha
A picture from our bench in Santa Monica... where we sat. and froze. waiting for a cab at 1:30 am on a Tuesday.  Because we're smart. 

#38. Build a fire pit
    This is interesting. Basically, here's how it goes.
  - Step 1. Buy way too many concrete blocks
  - Step 2. stack them in a square
  - Step 3. Light stuff on fire inside of said square
Yep. That's it. It isn't pretty, but I have every intention of buying some scrap tile @Habitat or something this summer, beating the crap out of it, and tiling in the outside of the concrete blocks in a mosaic-like style.

#41. Buy (and successfully wear) flat boots
   I don't know that anything else needs to be said. I bought flat boots. I look cute in them. :)

#47. Get a new TV for our LR
   For Thanksgiving, I bought us a new 51" giant tv. It is beautiful. I don't have any pictures of it, so you'll need to come see it yourself! Yay!

#51. Build seating area around fire pit
  You know how I said "Buy way too many concrete blocks"?
 The "too many" is what I made 2 benches out of. They aren't permanent. But I'm counting 'em!

#54. Go back to Reno or Vegas
    It was uhm... an experience. That's what I'll call it. It was interesting.  D had to go for work, so I tagged along. We got stranded in LA for half of the trip, but I made the most of it!
Some pictures:
View from our floor... SIGH

The View from our ROOM! Thanks Planet Hollywood for the complimentary upgrade! ♥ 

Holy MOLY our room was sweet! The thing you see on the far side- that's a WALL of a WINDOW with a remote controlled screen/blind thingie that rolled up on command. I felt like such a poor person because I found this so exciting. hahahah 


#61. Get a new mattress/box springs
   King. Size. Bed.
     That's right- I can sleep with my husband in the same bed and NEVER EVEN TOUCH HIM. Not that I want that... but I kinda do sometimes. You know. We're both wild sleepers. This thing is amazing. I'll post pictures of it one day. That way you can see how pretty our bed is with the headboard. :)

#76. Put a desk (of sorts) in the office
   Another thing I need to post a picture of is this DESK! I have 2 baby filing cabinets (the 2-drawer ones) and for Christmas, my brother gave me a giant piece of granite!!! It's BEAUTIFUL! and lays perfectly across the 2 cabinets to make a desk.
I. Love. It.
Makes me want new countertops... hmm...

There are some more that I don't think I've updated, but I'm just going to mark them out anyway.

Also: I'm counting #93 as complete as well. For Christmas, D's dad got Carmen and Tini Packers Cheerleader uniforms. I'm using those as their new outfits. SO CUTE!
 They're really short, so the girls look a little slutty.. but we all knew that about them all along.


And now I'm sleepy. That's all I have time/energy to update about tonight. Maybe more this next week... or next month. You never know! I like to keep you guessing!

Enjoy!
♥ EM


Friday, December 9, 2011

Good to know

A friend told me today that they saw something sparkley and it made them think of me.

Life Mission: Complete.

BAM!

♥ Em

Thursday, December 8, 2011

Merry McChristmas to you!

Last night, D left to go bowling and the house was normal.
He came home to a Christmas Wonderland! I think there's still more to do, though, so he will probably be surprised when he gets back tonight as well.
Sneaky Snake, I am!

Some pictures for you---

Our Tree! I'll put another picture when I wrap the other presents :)

This is beside the tree - against the wall you walk in and see. I wrapped the lamps with tinsel to make them Christmas-y! So fun! Who needs fancy crap, I use $1 tinsel and bobby pins!
Also, Note the Green and Yellow/Gold Balls. 12-0

 My boyfriend Santa greets you at the door. Be careful- he's watching even if he does appear to be winking! And he might be staring at your butt a little, too. Who knows.  We've had to get creative with him because he's old and fragile and Carmen's whip of a tail will kill him with one good lick if we're not careful!


The Children's Stockings. Tini on L, Carmen on R with Brown Dog on it

Even our DVDs are in the spirit!
 Yes, Santa dancing singing bear-Elvis and Large Elvis ornament that sings and dances and lights up. Love it!

Baby Christmas Tree on the table
More pictures are to come, I'm sure... but there's a little hint of how crazy our house looks right now.

Enjoy!
♥ EM


***UPDATE***
There is now a second Tree. It's 4 feet tall and in the window on the opposite side of the room :)  That's what happens when D goes to Franklin 2 nights in a row.  We'll see how he takes it...

Baby Tree with niece presents under it

Monday, December 5, 2011

Crazy about Pallets!

(This post was from 11/15, but for some reason just posted today and I don't know how to change the date.. so just imagine that I posted it then!)


 I went to town on some pallets this weekend...

Wanna seeee?
Headboard for our KING SIZE BED we're getting for Christmas. This is a QUEEN in front of it. Do not think I'm measurement-stupid and over-did it. I did that on purpose :) ALSO bed will be on a platform eventually, so the plywood won't be showing!

Shelf for my cookbooks. I sliced a pallet in half (my craftsmanship is remarkable with a sawzall. Look at those straight lines...) One day I might fix that.

Inspiration: http://www.theroosterandthehen.com/how-to-make-a-pallet-headboard/ 

But, this is what I did instead...
 I bought a boatload of pallets (literally, you could load them into a boat) and white washed most of them. I had some Kilz Ceiling paint leftover, so I mixed 1 part paint to 3 parts water and whisked it to a milk-like texture and just overinduldged all my pallets with said waterpaint. It gave them a weathered- almost mold covered- look and I LOVE it. Obviously, you can see the ones that hadn't gotten it yet, but this was step 4. (1- purchase pallets fpr $1 each from sketchy individual named Stooooneyyyy 2- paint 3-rip them to pieces)

We'll start with 4. Lining them up how I want them on the headboard. I kind of wanted to stagger them like bricks, but due to how anal I am (the ends wouldn't have matched up because they would have been fresh-cut wood edges against the weathered looking sides and I would have had to repaint every SINGLE piece to make it work), and how lazy I am (see previous parenthesis comment about the amt of work it would have taken), I thought this was better! It also was more sanity-saving than staggering would have been. Oh MY, someone would have gotten hurt!

Step 6. Complete.
Step 5. Then I made sure all were painted and lined up. Again. And took 4 of the insidey pieces from the pallets (they're like 2x4s but I don't know the measurements other than it's not 2 OR 4...) to give it an outside even edge on each side...
Step 6. Have children sit in front of it and look freakin ADORABLE.


Step 7. Nail to perfectly-measured plywood.  This SHOULD HAVE been the easiest part, as I sawed most of the nails off and just had to pop out 3 per board to nail in the original holes and leave the rest of the original nails, but my foresight when ripping the pallets apart was not the greatest and half of them had the center nail still in them... but beaten down into submission. That had to be removed from half of them--- which took us well past dark and into 50 degree weather. I was soon told to come inside and stop playing out in the dark & cold.

Step 8. Completely unnecessary. Come inside and not freeze to death.
I brought this inside, too, just so it didn't get eaten or infested with bugs on the ground... or bird-pooed on over night. At this time, we realized why other people just NAIL the BOARDS into the WALL instead of putting it on Plywood. It weighed about 200 pounds at this point. (Or maybe 70, but 200 sounds more realistic. I don't know)

After step number 7 was completed the next morning, we had to hang this. At this point- with all the planks on it- the board now weighed about 500 pounds (again, probably more like 100, but really... 500!).
Step #9. Find Studs, make fancy-pants stud-marker-things out of thumb tacks, yarn, and heavy objects. 
That's right, Fancy. Pants. We had to know where the studs where the whole time D was screwing this bad boy into the wall, but couldn't really think of another way besides my extra special way.  
Step 10. Find 10 friends to hold this 1000 lb beast to the wall while someone who knows how to use a screwgun thing screwguns it to the studs. 

Don't have 10 friends, you say?  I guess I could just hold it while D screws it into the wall.

I could just hold it while I remove my arms from their sockets. Yeah. Heavy. Hard to hold. 2 people.

But I wanted it hung that day, so I had to hold it all by myself. I may have gotten splinters in my chest and face at this point, because I was just using my whole body to push it against the wall. I'm thrifty like that.

(Speaking of splinters... you would not believe how many baby splinters I had in my arms, legs, and butt from sitting on and moving this stuff around. Next time, don't wear leggings/tights. Wear real pants. Good to know. Note taken.)


FINISHED PRODUCT 
So beautiful. Now we need to redecorate the bedroom...


This will look so good when we get our new King Size BED!
I am excited!

♥ EM

Way Past-Due Stuff-making updates

This post was from 12/4 but just posted this morning when I realized it never made it... oopsie

So, I know all my updates have been about making stuff- stuff I've made- stuff I'm going to make...
Suck it up, because more is COMING!
This is my first ever experience playing with canvases and putting them where people can see them. Yes. That's right, it's like I'm an artist - except not a really good one! 

This has been completed since October--- well, kinda completed. I'm still not 100% sure that i'm finished. I need to cut the edges off and wrap them, but I kind of think I need another bird.
What do you think?


So, yeah the Edges need cleaned up. Here's the pretty much finished product.


And if you would like to take a tour of my brain... here's the step by step! But be careful, you may get lost in there... 

#0. My inspirational stuff that I looked at and morphed into my own thing: 
   (Both pictures taken from Pinterest) 


#1. I taped (yes, classily taped) the canvases to the wall like I thought I would like. Don't underestimate me, now... this was tape job number 387290 and picture number 30. And calling D freaking out about "ARE YOU SURE THIS IS OK" time number 6.  It's a tough job he has, but someone has to embrace my crazy

#2. I then- Everrrr sooooo carrrrrefullllly ripped pages out of my Alice in Wonderland book and started modge-podge-glue-paper machet-ing them all over the canvases for texture...


#2.5/3ish.  I also cheated and knew where i wanted the branches to be, so I strategically covered the branches in the parts of the book I wanted to be visible. It looks like an accident, but it was 100% plotted out step by step.

And yes, in some of these there is wax paper on the table I'm using. That's because I'm 4 years old and I can't paint or glue anything without getting ie EVERYWHERE. We're talking in hair, on clothes, on the dang dog, and oopsie on the carpet. Maybe my creative artristry is better reserved for the garage...

or maybe I'm just making the place festive with my whoopsie marks?  It might be on purpose. You don't know!

 #3.5/4ish. Painted all non-branchy parts with pretty sky colored paint. Thanks, Martha. You are the stuff. Martha Stewart Craft Paint---- WORD

Just a little bit of some of the words and pictures under the paint show, so it's PERFECT!!!  

#5. We'll go with 5 because I have lost "ish" count.  I took water colors and colored all the branch parts with those. I tried brown- but that was disgusting, so the color I went with in the end was like a mustart and yellow and brown and something else mixed together.  It worked... 


 A Close-up for you...
#6? Is that where we are?  All the texture pages on, paint dried, and branches painted... I picked where I wanted the birdies to go and couldn't decide what I wanted to do with them. I was torn between painting the craft paint around and making them with black watercolor or making them black craft paint... I think I am glad I chose the craft paint- Much easier and prettier. I like the boldness better than if I had made them water-colory and muted.
Closer-up of the birdies:

I'll eventually slice off the edges of the paper that doesn't want to stick to the sides (no matter how much glue I use) and take ribbon and wrap around for smoothness like I did the other 2...  But for now, I'm ok with it.

What have you made recently? Please share!
(please oh please share my 2 blogger friends who sometimes read my blog!)

Don't you worry- there will be more.
I have done a lot since I last wrote...
Enjoy!
♥ EM