(This post was from 11/15, but for some reason just posted today and I don't know how to change the date.. so just imagine that I posted it then!)
I
went to town on some pallets this weekend...
Wanna seeee?
 |
| Headboard for our KING SIZE BED we're getting for Christmas. This is a QUEEN in front of it. Do not think I'm measurement-stupid and over-did it. I did that on purpose :) ALSO bed will be on a platform eventually, so the plywood won't be showing! |
 |
Shelf for my cookbooks. I sliced a pallet in half (my craftsmanship is remarkable with a sawzall. Look at those straight lines...) One day I might fix that.
|
Inspiration: http://www.theroosterandthehen.com/how-to-make-a-pallet-headboard/
But, this is what I did instead...
I bought a boatload of pallets (literally, you could load them into a boat) and white washed most of them. I had some Kilz Ceiling paint leftover, so I mixed 1 part paint to 3 parts water and whisked it to a milk-like texture and just overinduldged all my pallets with said waterpaint. It gave them a weathered- almost mold covered- look and I LOVE it. Obviously, you can see the ones that hadn't gotten it yet, but this was step 4. (1- purchase pallets fpr $1 each from sketchy individual named Stooooneyyyy 2- paint 3-rip them to pieces)

We'll start with 4. Lining them up how I want them on the headboard. I kind of wanted to stagger them like bricks, but due to how anal I am (the ends wouldn't have matched up because they would have been fresh-cut wood edges against the weathered looking sides and I would have had to repaint every SINGLE piece to make it work), and how lazy I am (see previous parenthesis comment about the amt of work it would have taken), I thought this was better! It also was more sanity-saving than staggering would have been. Oh MY, someone would have gotten hurt!
 |
| Step 6. Complete. |
Step 5. Then I made sure all were painted and lined up. Again. And took 4 of the insidey pieces from the pallets (they're like 2x4s but I don't know the measurements other than it's not 2 OR 4...) to give it an outside even edge on each side...
Step 6. Have children sit in front of it and look freakin ADORABLE.

Step 7. Nail to perfectly-measured plywood. This SHOULD HAVE been the easiest part, as I sawed most of the nails off and just had to pop out 3 per board to nail in the original holes and leave the rest of the original nails, but my foresight when ripping the pallets apart was not the greatest and half of them had the center nail still in them... but beaten down into submission. That had to be removed from half of them--- which took us well past dark and into 50 degree weather. I was soon told to come inside and stop playing out in the dark & cold.

Step 8. Completely unnecessary. Come inside and not freeze to death.
I brought this inside, too, just so it didn't get eaten or infested with bugs on the ground... or bird-pooed on over night. At this time, we realized why other people just NAIL the BOARDS into the WALL instead of putting it on Plywood. It weighed about 200 pounds at this point. (Or maybe 70, but 200 sounds more realistic. I don't know)
After step number 7 was completed the next morning, we had to hang this. At this point- with all the planks on it- the board now weighed about 500 pounds (again, probably more like 100, but really... 500!).
Step #9. Find Studs, make fancy-pants stud-marker-things out of thumb tacks, yarn, and heavy objects.
That's right, Fancy. Pants. We had to know where the studs where the whole time D was screwing this bad boy into the wall, but couldn't really think of another way besides my extra special way.
Step 10. Find 10 friends to hold this 1000 lb beast to the wall while someone who knows how to use a screwgun thing screwguns it to the studs.
Don't have 10 friends, you say? I guess I could just hold it while D screws it into the wall.
I could just
hold it while I remove my
arms from their
sockets. Yeah. Heavy. Hard to hold. 2 people.
But I wanted it hung that day, so I had to hold it all by myself. I may have gotten splinters in my chest and face at this point, because I was just using my whole body to push it against the wall. I'm thrifty like that.
(Speaking of splinters... you would not believe how many baby splinters I had in my arms, legs, and butt from sitting on and moving this stuff around. Next time, don't wear leggings/tights. Wear
real pants. Good to know.
Note taken.)
FINISHED PRODUCT
 |
| So beautiful. Now we need to redecorate the bedroom... |
This will look so good when we get our new King Size BED!
I am excited!
♥ EM


 We'll start with 4. Lining them up how I want them on the headboard. I kind of wanted to stagger them like bricks, but due to how anal I am (the ends wouldn't have matched up because they would have been fresh-cut wood edges against the weathered looking sides and I would have had to repaint every SINGLE piece to make it work), and how lazy I am (see previous parenthesis comment about the amt of work it would have taken), I thought this was better! It also was more sanity-saving than staggering would have been. Oh MY, someone would have gotten hurt!
 Step 7. Nail to perfectly-measured plywood. This SHOULD HAVE been the easiest part, as I sawed most of the nails off and just had to pop out 3 per board to nail in the original holes and leave the rest of the original nails, but my foresight when ripping the pallets apart was not the greatest and half of them had the center nail still in them... but beaten down into submission. That had to be removed from half of them--- which took us well past dark and into 50 degree weather. I was soon told to come inside and stop playing out in the dark & cold.
  Step 8. Completely unnecessary. Come inside and not freeze to death.


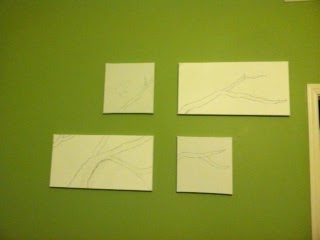 #1. I taped (yes, classily taped) the canvases to the wall like I thought I would like. Don't underestimate me, now... this was tape job number 387290 and picture number 30. And calling D freaking out about "ARE YOU SURE THIS IS OK" time number 6. It's a tough job he has, but someone has to embrace my crazy
  #2. I then- Everrrr sooooo carrrrrefullllly ripped pages out of my Alice in Wonderland book and started modge-podge-glue-paper machet-ing them all over the canvases for texture...
 #2.5/3ish. I also cheated and knew where i wanted the branches to be, so I strategically covered the branches in the parts of the book I wanted to be visible. It looks like an accident, but it was 100% plotted out step by step.

 #6? Is that where we are? All the texture pages on, paint dried, and branches painted... I picked where I wanted the birdies to go and couldn't decide what I wanted to do with them. I was torn between painting the craft paint around and making them with black watercolor or making them black craft paint... I think I am glad I chose the craft paint- Much easier and prettier. I like the boldness better than if I had made them water-colory and muted.